Adjusting Membership Dues Draft Invoices for Upcoming Dues Renewals
Accrisoft Freedom allows you to create Membership Dues Invoices to provide to Members who have their renewals upcoming.
The process to create these Draft Invoices is outlined in the Knowledge Base Article: Creating Membership Dues Invoice Drafts for Upcoming Dues Renewals. If you are unfamiliar with creating Draft Invoice, please review this article.
Once these Invoices are created as Draft Invoices they can be adjusted to account for pricing changes and to allow for the addition of add-on items.
Begin by navigating to the Operations Application and select the Membership Dues Module. Select the Renewals tab, and ensure you are on the Upcoming sub-tab.
Select the Month and Year of the invoices you wish to work with.
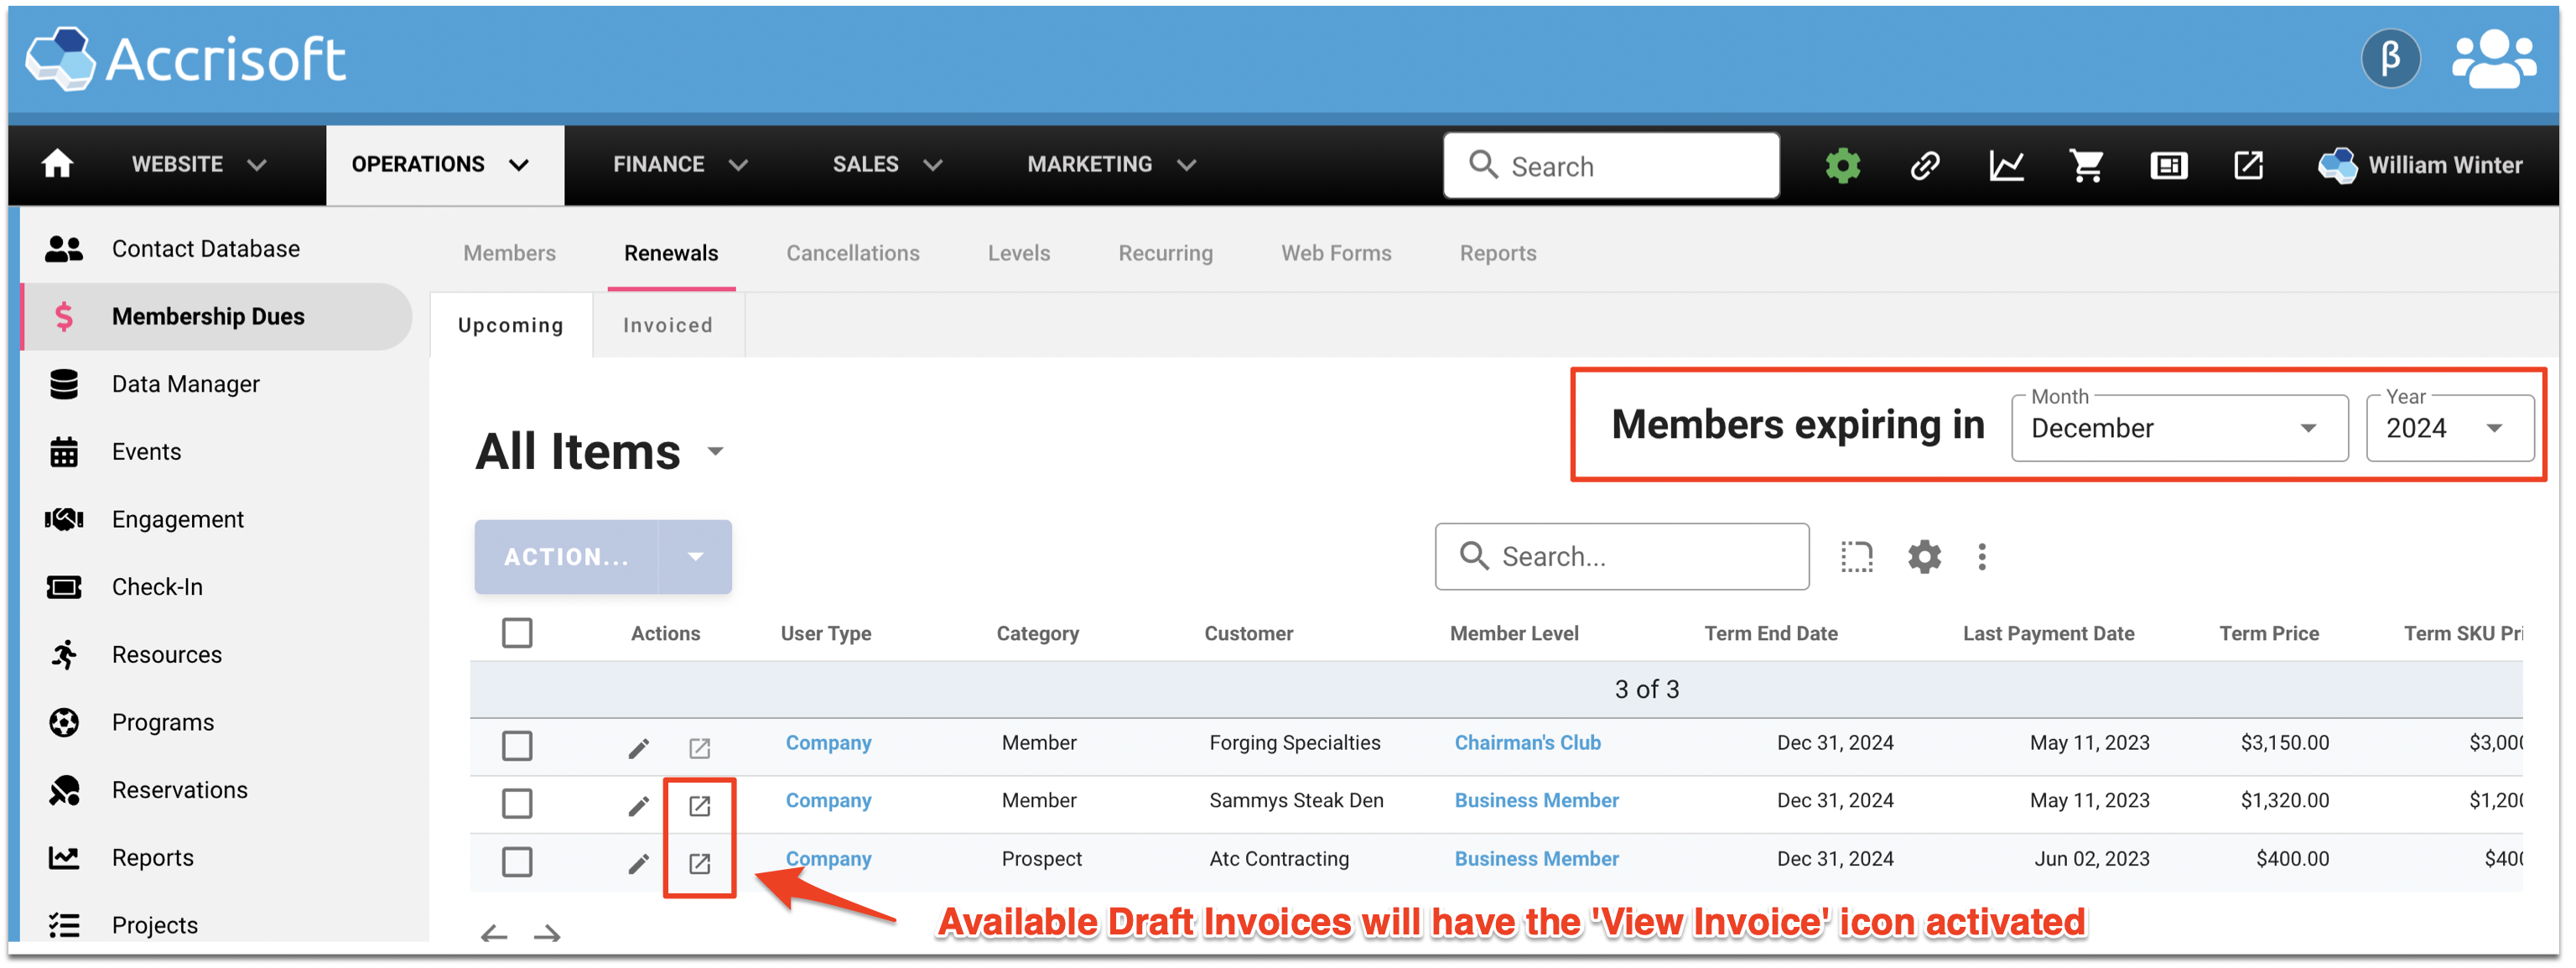
Available Draft Invoices that can be adjusted will have the 'View Invoice' icon activated.
To make an adjustment to a Draft Invoice, place a checkmark in the box at the left of the Draft and click the blue 'Action...' menu.
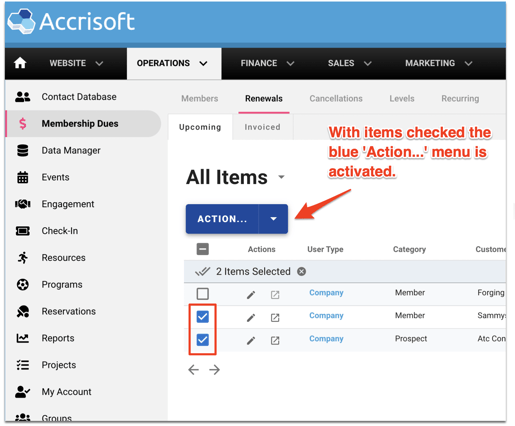
Note: If you place a checkmark in more than one draft, the same adjustment will be made to each draft you have selected. This allows for changes in bulk if necessary. For example, if the Dues Level 'Business Member' is increasing by 3%, you can select all 'Business Member' Draft Invoices and adjust them all at the same time.
Click the blue 'Action...' menu to reveal the options.
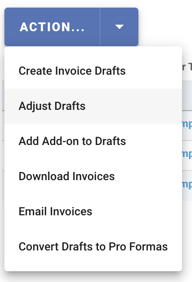
The options under the Action... menu are:
- Create Invoice Drafts
- Adjust Drafts
- Add Add-on to Drafts
- Download Invoices
- Email Invoices
- Convert Drafts to Pro Formas
In this example we will be adjusting the Draft Invoices, so click on the 'Adjust Drafts' options.
The 'Adjust Duel Level Price' window will appear.
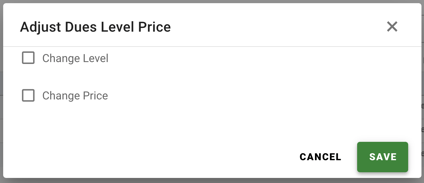
Adjustment options to change the member dues level or to change the dues price or both are presented.
Selecting the 'Change Level' option presents a menu with a list of all the Member Dues Levels. If the member who's drafts you have selected are changing their Dues Level on Renewal, select the new Dues Level from this list.
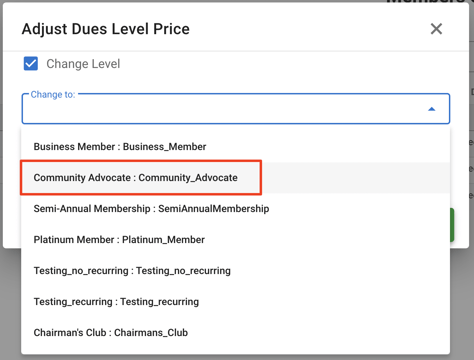
In this example we will change the 'Business Members' to the 'Community Advocate' Dues Level.
If you are also adjusting the price of the Dues Level Renewal, place a checkmark in the 'Change Price' box.
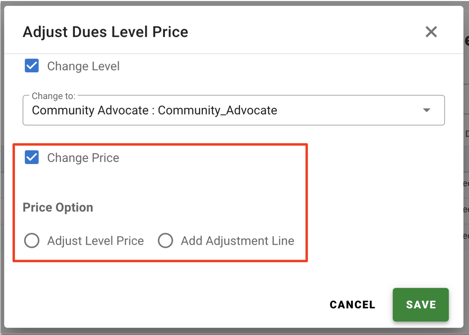
You will be presented with options to either 'Adjust Level Price' or 'Add Adjustment Line' and only one of these options are allowed to be selected.
By selecting 'Adjust Price Level' three options are presented.
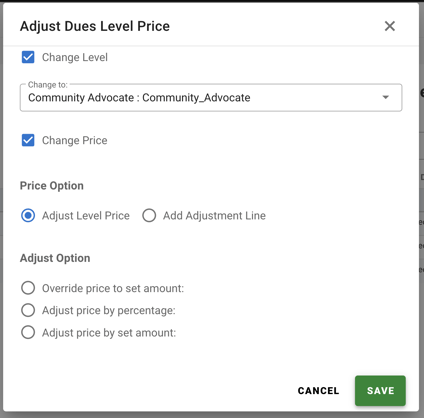
You may:
- Override price to set amount
- Adjust price by percentage
- Adjust price by set amount
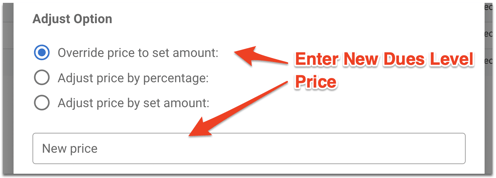
Override price to set amount
With this option you enter the new total price of the Dues Level to be billed on Renewal
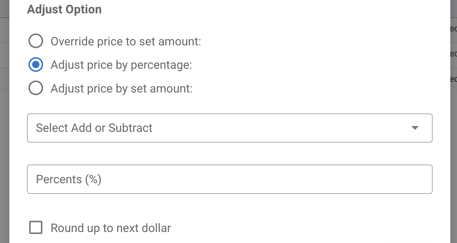
Adjust price by percentage
With this option you can either Add or Subtract a percentage from the Dues Level, set the Percents to adjust by, and optionally round the change to the next dollar.
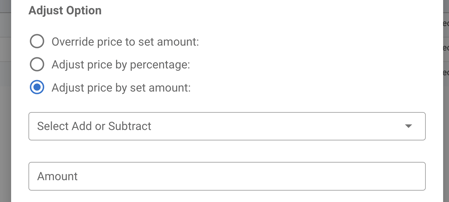
Adjust price by set amount
With this option you can either Add or Subtract a dollar amount from the Dues Level, and set the Amount to adjust by.
In this example we will Add a $3.00 adjustment to the Dues Level.
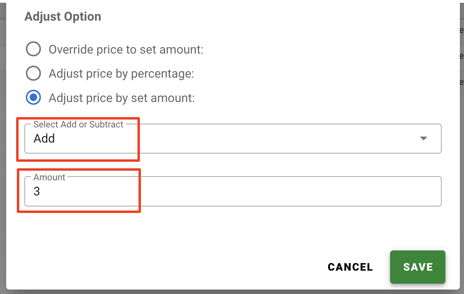
Click the green 'Save' button to save the adjustment.
If we click on the 'View Invoice' icon we can preview the Draft Invoices to verify our changes.
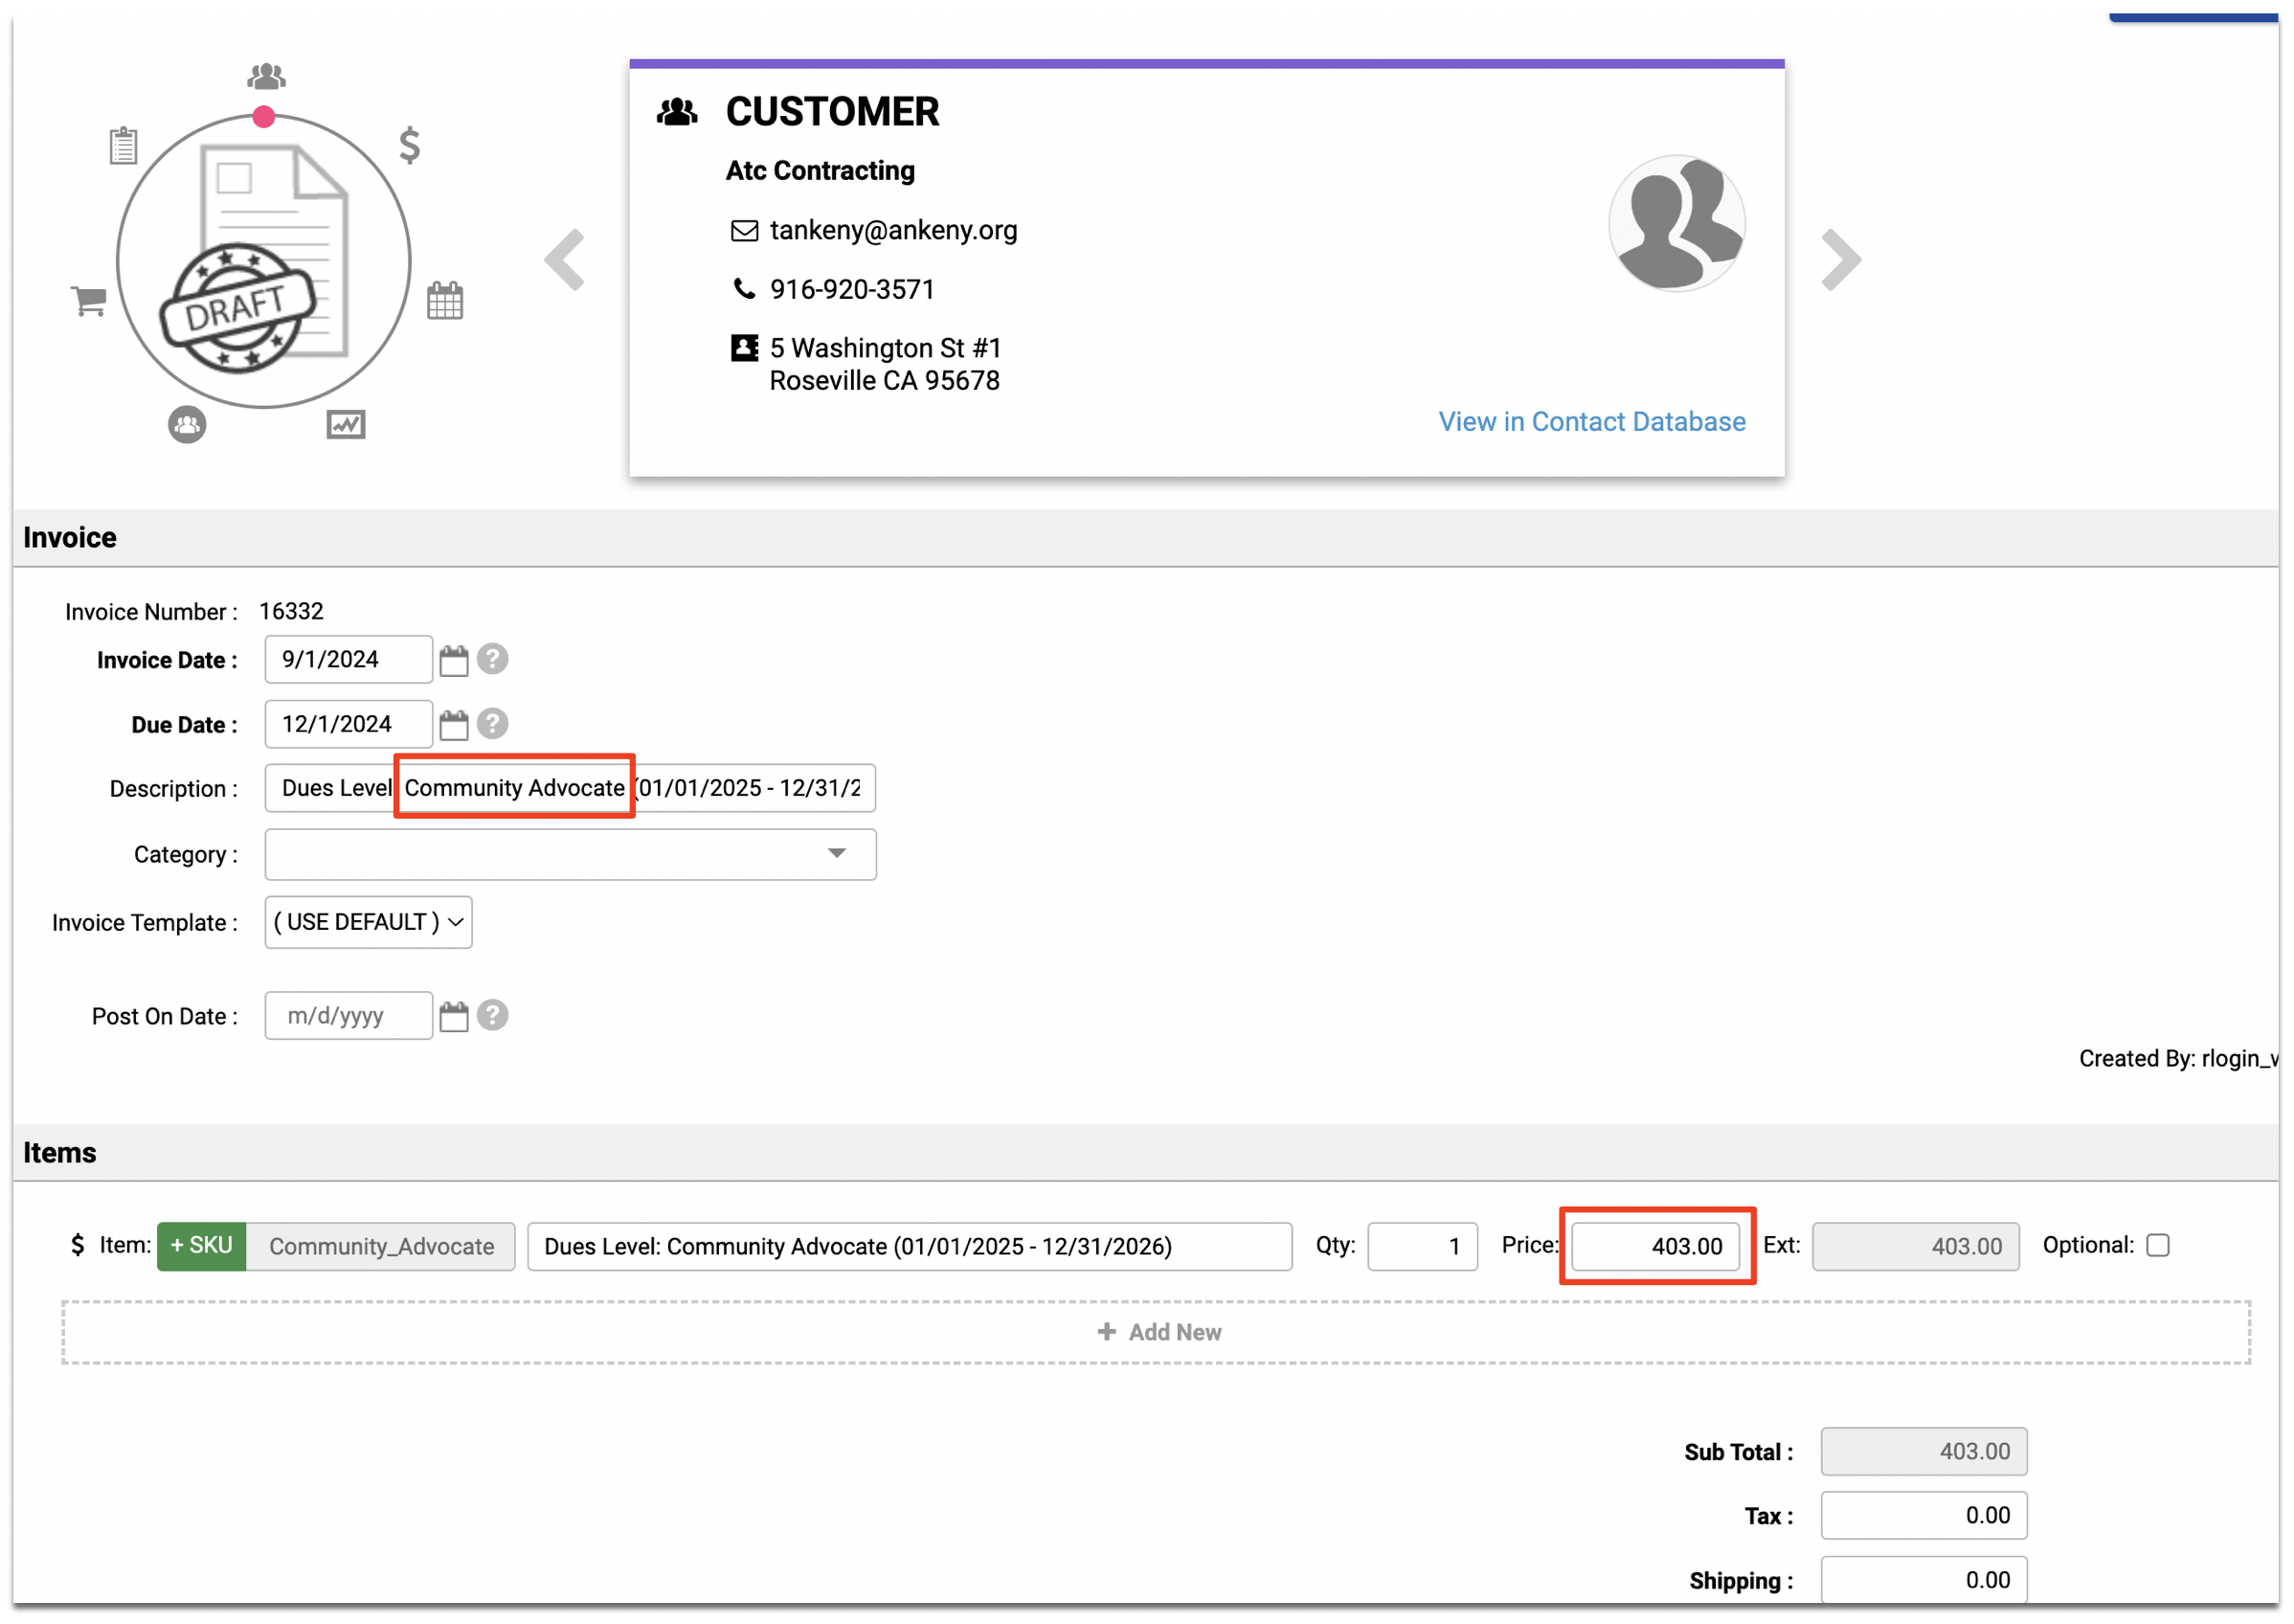
We can see on renewal the level is changed from 'Business Member' to 'Community Advocate' and the Dues Level Price has increased from $400.00 to $403.00. This price change is rolled up into the single Dues Level Line Item.
Adding an Adjustment Line Item
If you do not want the Dues Level Adjustment rolled up into the prior Dues Level Line Item, you can have the adjustment places as its own Line Item.
In the 'Adjust Dues Level Price' window, select the 'Add Adjustment Line' item.
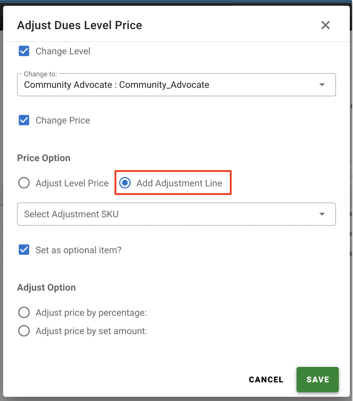
This will allow you to create a new Line Item on the invoice for the adjustment.
Select the Adjustment SKU from the 'Select Adjustment SKU' menu. This is required and must be configured beforehand.
Place a checkmark in the 'Set as optional item' box if this is to be an optional Line Item on the invoice.
Select to adjust by either a percentage or a set amount.
In this example we will add a new Line Item to the Draft Invoice to Add a 3% adjustment, rounded up to the next dollar.
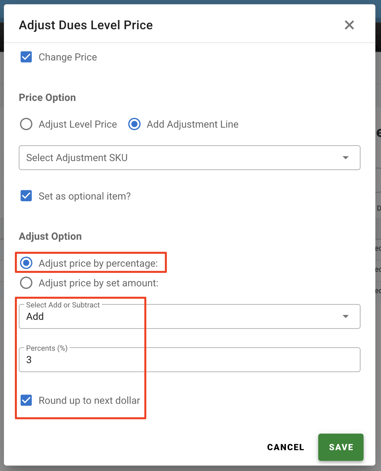
Click the green 'Save' button to save the adjustment.
Upon reviewing the Draft Invoice we can see there is a new optional Line Item on the invoice for the adjustment.
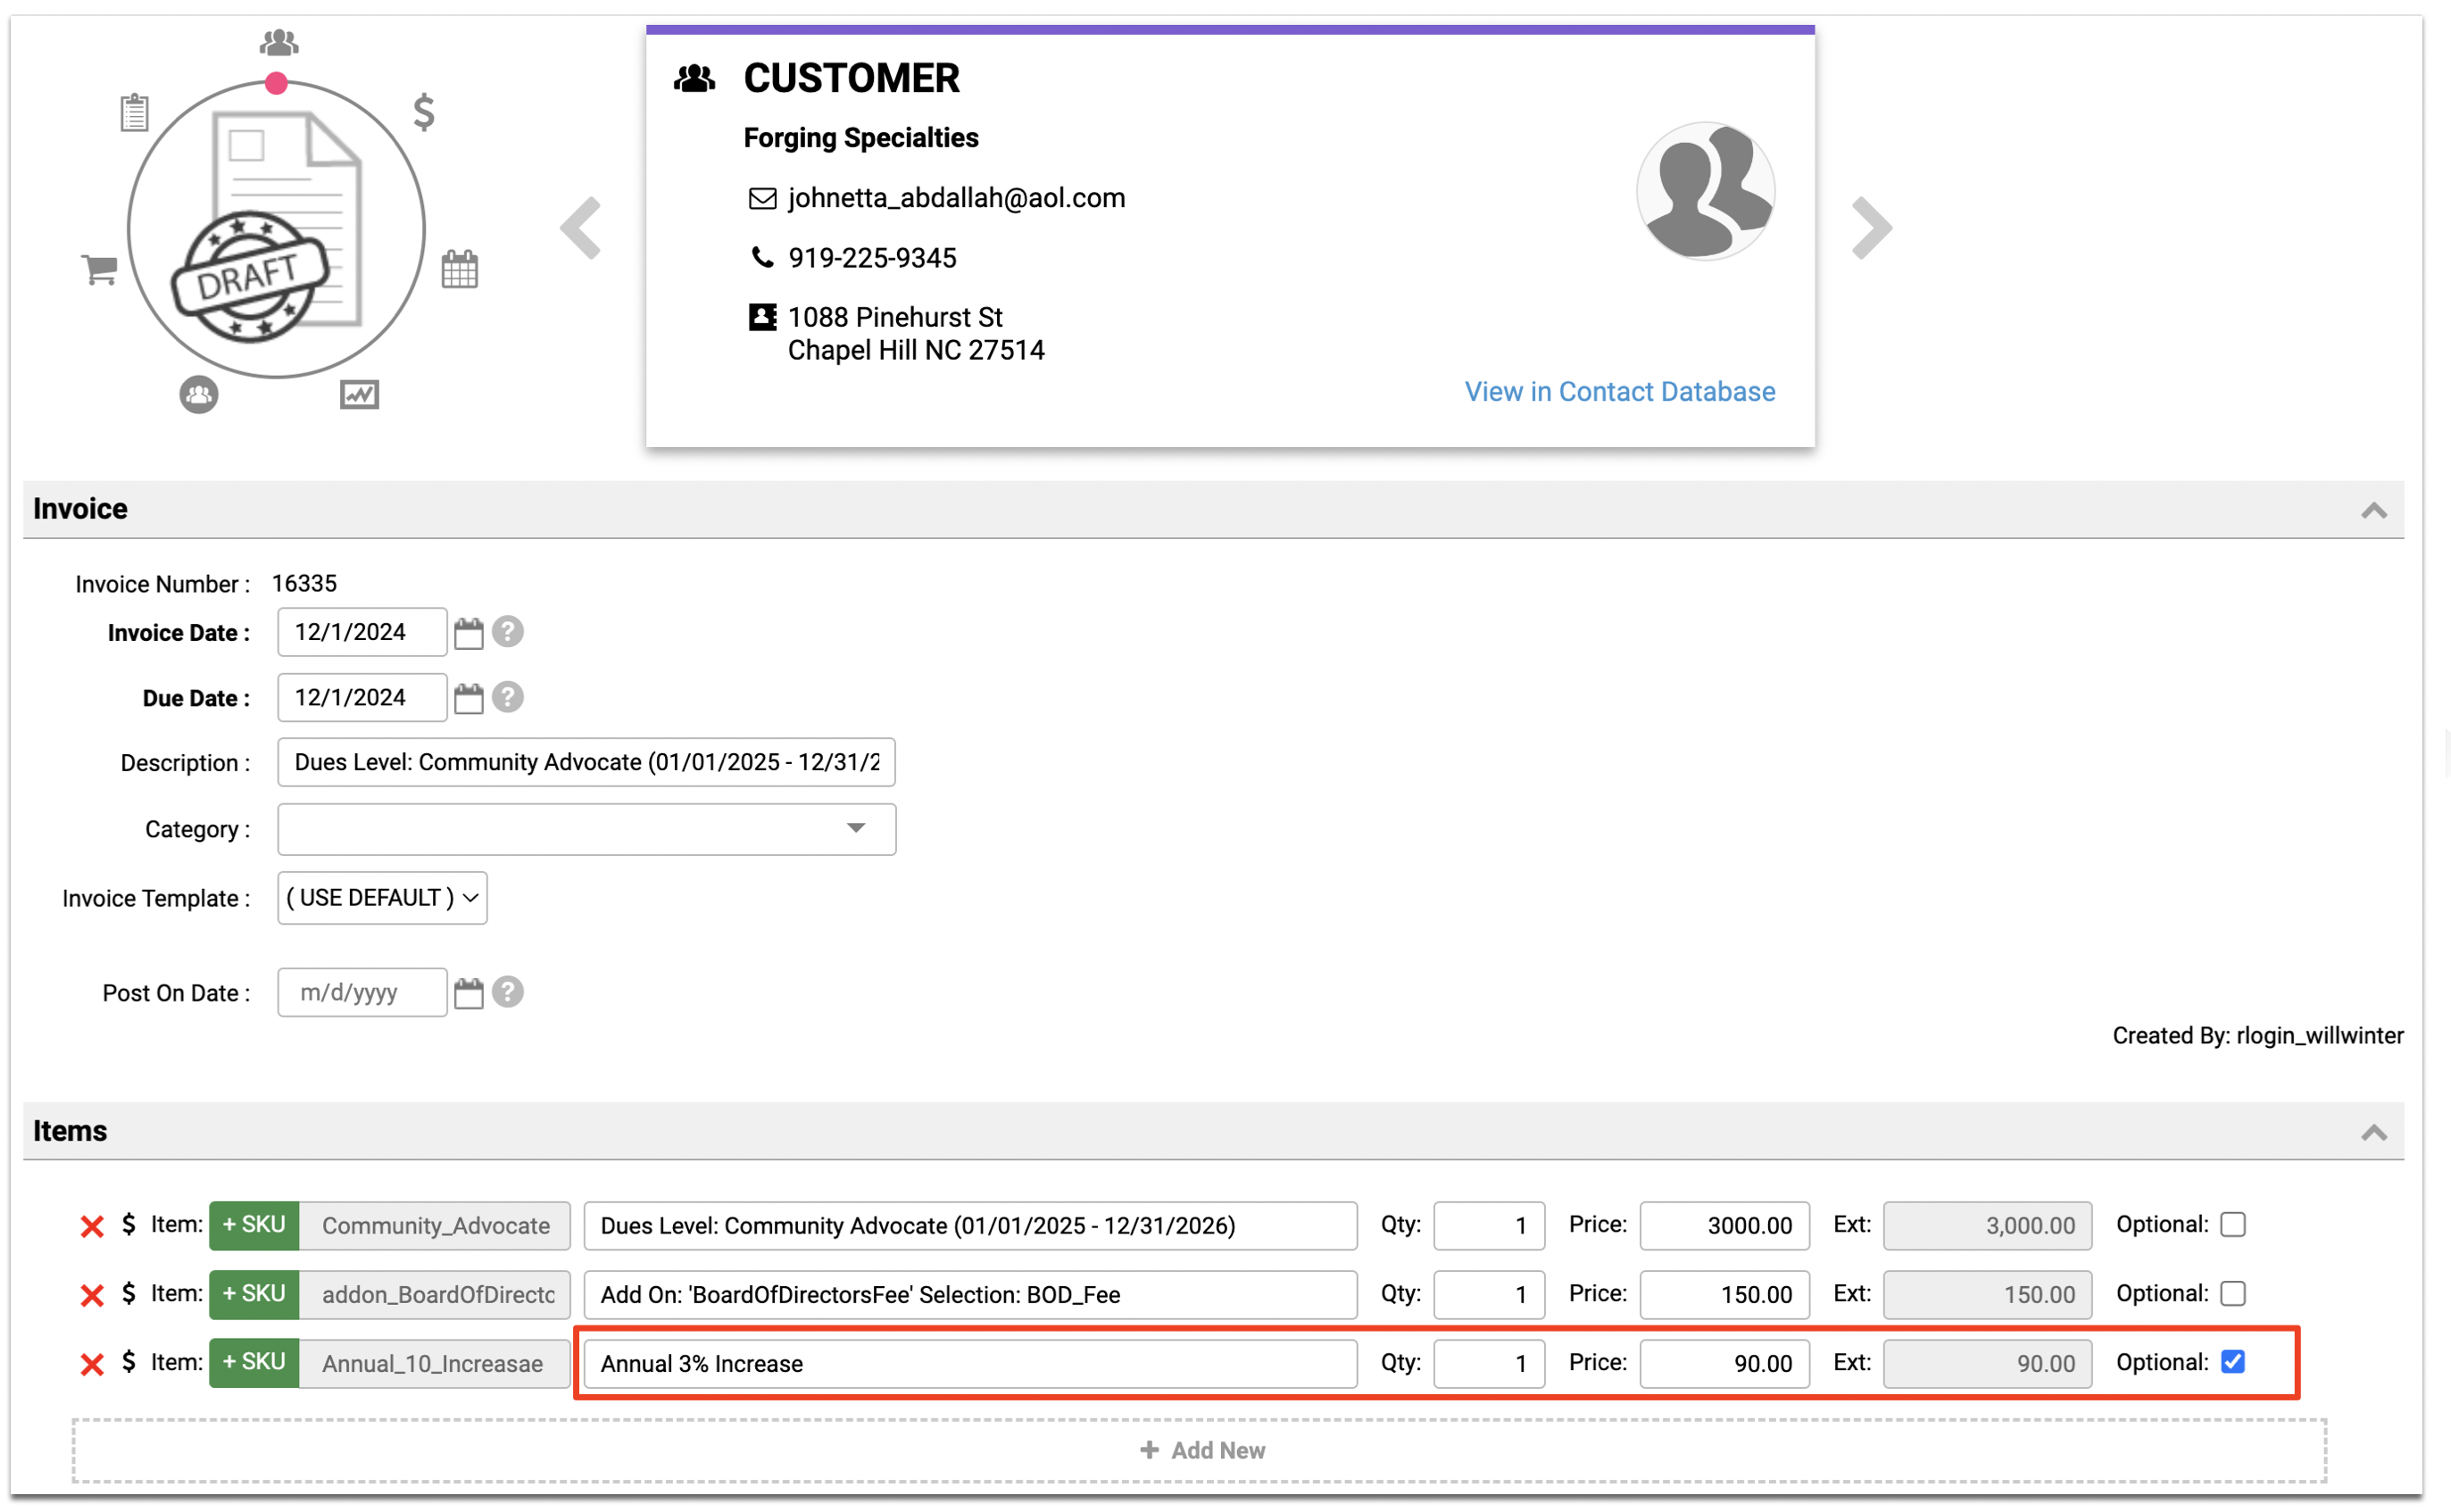
Note: Only Draft Invoices and Pro Forma Invoices may contain optional Line Items.
To convert your Draft Invoice to a Pro Forma Invoice, from the list of Draft Invoices, select the invoices you wish to convert.
Under the blue 'Action...' menu select the 'Convert Drafts to Pro Formas' option.
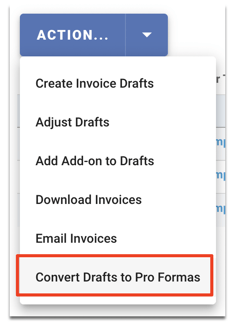
The Draft Invoice will be converted to a Pro Forma Invoice for the customer to pay.
Related to
![accrisoft_logo_med.png]](https://help.accrisoft.com/hs-fs/hubfs/accrisoft_logo_med.png?height=50&name=accrisoft_logo_med.png)